Tuesday, November 29, 2011

Altered Clipboard

Today, I shared a project that I created on the myStamp BOX blog.

I've had this clipboard since my Scraptivity days (a kit club I designed for in 2006-07).  I've held onto it because a) I'm a pack rat and b) I just knew that I would find time to alter it one day!

And, here we are...


Supplies used:  Melissa Frances clipboard; Bazzill Basics cardstock; Fancy Pants patterned paper and cardstock stickers; myStamp BOX stamps (Repeat After Me, Rustic Outlines);  Glue Dots; Ranger Distress ink; twine.

Here's a detailed shot of the title:


The clipboard is small - maybe 6" x 9"? - so i can easily add my favourite 4x6 photos and swap them out when I need a change of scenery.

But with that adorable face, who knows when that will be!?  My father-in-law took the above photo of Gary when he was about 8 or 9 months... the same age as Connor is in this photo:


Just when I'm convinced that he takes after my side of the family, something like this pops up and proves me wrong! :)

Thanks for looking - be sure to check out both the WeScrap and the myStamp Box blogs beginning on December 1st - both are hosting 12 Days of Christmas inspiration!  I can't wait to share my projects with you!!

Sunday, November 27, 2011

Seven Sunday Blessings

If you are looking for the Canvas Corp/myStamp BOX blog hop, click here
hop along for a chance to win, until 6pm tonight!


{artwork by Stephanie Ackerman}

This weekend, our American friends and family celebrate Thanksgiving.  So I'm sending out blessings to you all, as I celebrate the blessings in my life this week. 

This week, I'm thankful:

1.  for the extra pair of hands I have at work all week, in my new trainees.  While the learning curve is very steep in my job, they are picking it up quickly and able to take some of my tasks off my hands, allowing me to focus on other priorities.

2.  that my friend, Sarah, was able to travel safely from Michigan for a day of scrapbooking - or at least chatting, giggling and SOME scrapbooking.  Bummed out, though, that she got hauled in at the border by someone on an apparent power trip.  I think I may have to head that way for our next visit!

3.  for clementines.  Sweet, juicy, easy to peel.  What's not to love?

4.  for my Winter 2011/12 issue of Canadian Scrapbooker that arrived earlier this week!  And although we skipped my photography article this issue, I was so happy to see many of my friends published!!

5.  that Connor is still loving swimming and that he has improved so much this year, under his new coach's tutelage.  At Saturday's practice, the coach pulled everyone out of the pool except for Connor and had him demonstrate his freestyle stroke because he has perfect technique.  Can't wait to see how he does in Guelph this year!!

6.  for Black Friday sales - I didn't brave the crowds or the border crossing, but I scored some great online deals!  Picked up Connor's Christmas gift for nearly 50% off!

7.  that I had deadlines this week that made me prioritize my scrapbooking.  I completed some layouts that make me really happy!!

What are YOU thankful for this week?

Thursday, November 24, 2011

Blog Hop!!


Welcome to the Canvas Corp and myStamp BOX “Partner Blog Hop”!

If you have just happened upon our event now, please begin your journey on the Canvas Corp blog here.

Many of our wonderful designers are joining us today to show off some inspirational creativity. See how well Canvas Corp and myStamp BOX products are working together! 

Ready?  Here we go!
                              Canvas Corp <- please start here
                                                   Sue Sykes <-- you are here - and I'm glad! :)
We are giving away some amazing products from both participating companies. All you have to do is COMMENT on all of the designers' blogs along your journey to WIN. Our two Hop winners will be drawn from all participants and will be announced on the myStamp BOX blog and Canvas Corp blog on Monday, November 28th, so all comments are due by Sunday November 27th at 6pm EST. Good Luck!

I received some lovely goodies from Canvas Corp and myStamp BOX - I created a countdown chalkboard calendar for the kids! :


Supplies used:  Canvas Corp canvas heart, chalkstock, linen cord, decorative clothespin and mini clothespins; myStamp BOX stamps (Let It Snow, Rustic Outlines, Mini Alpha - Small Box); Tsukineko Staz-On ink; Stampin' Up Craft Ink; Ranger embossing powder; Faber Castell Gelatos (metallic); Craft Smart metallic ink (silver); chalk.

(Sorry for the dark photo - I wanted a photo of it hanging up and there's not much light when I leave for work OR when I get home!  Boooo, winter... :(

I kept it really simple, with minimal embellishments because I'm sure that little hands will be wanting to add the chalk numbers and I didn't want to have to keep repairing it!  Instead I used the stamps as accents!

I misted my canvas heart with water and coloured right onto the canvas with the Gelatos.  I then blended the colours with a paintbrush and let dry.  Using Staz-On, I stamped snowflakes all over and added highlights with silver metallic paint, watered down to a milk-like consistency.


You can't really tell in photos but the Gelatos and the silver paint have a lovely sheen to them!!

Using the watered down silver paint, I also painted the white clothespin to add shimmer to it, and to help it blend in with my project's colour palette.  With the pigment ink, I stamped the title on the chalkstock with stamps and embossed to heat set.  I placed a dab of silver metallic paint full strength on my craft mat and just dragged the edges of the chalkstock through it.


I cut the linen cord to length, knotted the ends and attached it to the canvas using natural mini clothespins that I painted using the Gelatos.

And voila!

Now it’s time to HOP along and find out what the next talented designer has created. Your next designer is 
Jeannie DeGruccio of Canvas Corp.  

Don’t forget to leave a comment below for a chance to WIN one of our TWO product giveaways!  Happy Hopping - and Happy Thanksgiving to our American friends!

Wednesday, November 23, 2011

Another Layout!

The good news about having lots of DT commitments is that it keeps my mojo flowing!

One of the challenges for the WeScrap Design Team call was to share a never-seen layout.  I had just created my layout for which I shared the sneak peek a few days ago and I think it is one of my favourite layouts, to date.  So could I crank out another one, worthy of the call, in a few days?

Well, I managed to get one done, which is half the battle!  I don't know if it's my favourite, but I LOVE how it turned out - the bright colours and that sweet face make me happy.


Supplies used: Bazzill cardstock; Echo Park Paper Co. patterned paper, stickers; myStamp BOX stamps (Wishing You Sunshine, Seal It!, Colorful Companions); Stamp Craft ink; Stampin' Up glitter (Dazzling Diamonds); American Crafts Thickers; Lily Bee alpha stickers; Martha Stewart Crafts, Fiskars and Marvy Uchida punches; Spellbinders Nestabilities (Standard Circles Large, Classic Scalloped Circles Large); Making Memories rhinestone brad;  Glue Dots; Marvy Uchida marker; ribbon and button from my stash.

I love this photo I had taken of Aili at her granddad's 65th birthday party.  It was so hot that we dragged out the sprinker, stripped her down to her Little Swimmers and tank top and let her go nuts!

Here are the details:


Journaling reads:  You had so much fun, running through the sprinkler with Eveie Kim at Granddad's 65th birthday party.  So cute in your orange hat, frilly tank top and Little Swimmers panties, you got thoroughly drenched!  But it didn't dampen your smile! ~ July 2006

Check back tomorrow - the myStamp BOX designers and I are teaming up with Canvas Corp. for a blog hop.  Start at the Canvas Corp. site at 10am EST for lots of inspiration - and really cute canvas products!! There will be prizes from both Canvas Corp. AND myStamp BOX!! Yippee!

Tuesday, November 22, 2011

So Not Ready For This


Today, at dinner, the proverbial "other shoe" dropped.

Connor asked me if it was okay if he went to the movies with his friend, B.  Just about to say yes, he then dropped the bomb.

C:  "Well, B is going with his gf, and I would ask someone to go with me - you know, as a friend..."  (and yes, he said "gee-ef" - acronyms are taking over our lives at a rapid rate as he has become a texter)

Me:  "Uh....."

C:  "I told Dad and he said you had to talk about it... But you probably won't let me."

Me:  "Uh...." (thinking, 'oh great, now he's starting with the guilt')

C:  "It wouldn't be like a real 'date', Mom - I know you said I'm too young for dating.  It would just be as friends."

Me:  "Uh...." (thinking, 'Really?  Do I look that naive?')

C:  "Never mind.  I didn't think you'd let me."

At this point, I realized that my answers up to this point were not really sufficient at all.  I looked at him across the table from me, with his broad shoulders and a hint of peach fuzz on his cheeks and I realized that I still saw him like this:


Still, every fibre of my being was screaming, "YOU ARE TOO YOUNG TO BE GOING ON A DATE!!!"

Right?  Am I right?!?!

{Sigh}  It's true what they say... the bigger the kids, the bigger the worries.

I told him that while I trust his judgement and know that he is respectful and kind, it's still too young for a one-on-one date.  I also mentioned that if he wanted to go to the movies with a group of kids from his class, he would have my blessing.

He's been pouting all night.

Welcome to the tweens.

Monday, November 21, 2011

Hurts So Good!

John Cougar Mellencamp knew what he was talking about!

I spent the weekend, working on some DT projects and while it was painful to get back into the swing of things (my mojo seems to have left the building), it felt good to create again!

And my project turned out so damned cute (if I do say so myself) that I want to share it with everyone!  Sadly, it's for a Canadian Scrapbooker project so you'll have to wait until March 1st when the Spring issue is released.

But... here's a little sneak peek! ;)


Come on, March 1st! :)

Sunday, November 20, 2011

Leave Your Legacy: Movie Magic

Time for a new Leave Your Legacy challenge! If you're new to my blog, welcome! You can learn more about my Leave Your Legacy challenge here.

To date, there were 541 movies slated to release in 2011. [source] In 2010, box office sales totaled $10,463,366,300. [source] Regardless whether you go to the movies every weekend, or rent the occasional movie, one can't deny that they are a big part of our entertainment industry.

Our taste in movies is just another facet of our personality that we can share with future generations.  The bonus is that in documenting this part of our lives, our kids and grandkids can look back and marvel that their parents and grandparents used to like watching "old movies"!  

I mean, did you ever think about YOUR parents going to the show to see Casablanca?!?

Your challenge this week:
In some way, document movies you have seen.  It could be a list of your favourite Top 10 movies.  Or perhaps, the list of movies that you have seen this year.  It's up to you... try using DVD cover images, movie stubs - use your imagination!

If you'd like to participate in this year long challenge, please share your layout below, using Linky Tools, by 11:59pm EST on December 31st, 2011. Please see the Leave Your Legacy page for guidelines, before linking here. Winners will be announced on January 1st, 2012.

Saturday, November 19, 2011

Recess Time

I have a few more projects that I forgot to post, using the WeScrap November kit, Recess!

 Using my Pink Petticoat digital stamps, I created this simple card:


Supplies used:  Bazzill Basics cardstock; Jillibean Soup patterned paper; Pink Petticoat digital stamps (With Flowers); Spellbinders Nestabilities (Labels Four Small); Cuttlebug embossing folder (Dot Matrix); various markers.

I had a hard time finding markers to match the patterned paper - I wish I had used my watercolour pencils.  And as you can see, the tips of the markers weren't fine enough for me to get right into the corners... :(

What I DO love about this card, though, is the embossed background and die cut shapes, using my new Big Kick!!  Well, not new - I bought it at ScrapFest in April, but I've finally broken out the embossing folders that I bought and boy, oh boy!!  I love it!

Here's another card, using the kit:


Supplies used:  Bazzill Basics cardstock; Canadian Scrapbooker Super Stock; myStamp BOX stamps (Border Lines); Versamark ink; Ranger embossing powder; Ranger Adirondack Color Wash mists; Spellbinders Nestabilties (Classic Scalloped Circles Large); Crate Paper stickers; Maya Road stick pins; Glue Dots; Prima wooden button; twine and ribbon from my stash.

The red circle was die cut using my Nestabilities and stamped with the circle from the Border Lines stamp set from myStamp BOX and Versamark ink.  I then heat embossed it with clear embossing powder.  Once cool, I misted it with Red Pepper and Espresso mists and let dry.


Lots of dimension on this one... definitely not one that I'd trust to Canada Post to deliver safely!  May have to hand deliver this one... :)

Friday, November 18, 2011

myStamp Box Family Showcase

This month's theme on the myStamp Box blog is Family.  You can check out all of the DT projects here.

My project is a simple explosion box, inspired by this purse by kellyjg on Splitcoast Stampers.  My daughter, Aili, constantly asks me if she can scrap with me when I am working on projects in my studio, so I created this for her to complete:


Supplies used:  Bazzill Basics cardstock; Crate Paper patterned paper; myStamp BOX stamps (Colorful Companions, Mini Alphas); Tsukineko ink; Ranger embossing powder; Bo Bunny clear acrylic label shape (used as template for flap); Nestabilities scalloped circles; Glue Dots; Basic Grey magnetic closure; ribbon.

I left the inside for her to decorate as she likes:


She loves how girly it is!

Wednesday, November 16, 2011

38 days!

Only 38 days til Christmas, that is!

To help you out, check out the WeScrap blog, beginning December 1st and join us for the 12 Days of Christmas!  There will be 12 days of inspiration and ideas for the holidays!


Saturday, November 12, 2011

November WeScrap Challenge

Feeling decidedly fall-ish this month, both in weather and mood, I was inspired by this unique fall bouquet and created a colour challenge from it for my challenge on Nov 10th:


I love the mix of purples with orange and persimmon.  The pea green colour adds depth and the dark brown grounds the entire colour palette.

Here's what I created with this inspiration:


Supplies used:  Bazzill Basics cardstock; myStamp BOX stamps (Sigh Gush Gasp, Symbols); Versamark ink; Ranger embossing powder; Fiskars, EK Success and Martha Stewart punches; Marvy Uchida pens; Glue Dots; velvet paper and ribbon from stash.

After creating the challenge, I was excited to get started!  I raided my paper stash and pulled out all of the colours.

And then I panicked.

How could all of these colours  work cohesively and come together into a pleasing combination?

Yet here we are... :)


I created the doily border using this tutorial that I found on one of my boards on (you guessed it!) Pinterest!

Ah, Pinterest, how I love thee!

Friday, November 11, 2011

Lest We Forget


Did you wear your poppy today?

Thank you to all the courageous men and woman who risk their lives each and every day to ensure our safety and freedom.

We won't forget it.

Monday, November 07, 2011

More Projects to Share

Every good layout has a story.

Or is it, every good layout tells a story?

Either way, this layout, created with the November Recess kit from WeScrap, definitely has a story.  I mean, just look at that photo...


Supplies used:   Bazzill Basics cardstock; Fancy Pants and Jillibean Soup patterned papers; Martha Stewart Crafts border punches; Crate Paper letter stickers; Cosmo Cricket Gluebers; Glue Dots; Ranger Colour Wash; ribbon, button brad and star from kit; twine, denim, doily and receipt stuff from my stash.

This is Gary's brother, Scott, when he was about 5 years old.  You may remember this layout that I did of him - apparently, the posing never ends... :D

We were sorting through boxes of photos to use for a video for my mother-in-law's memorial service and I came across this photo.  Gary and I started to laugh uncontrollably!  I mean, that look!! Every time I look at it, I can picture him saying, "So I was talking to my stock broker the other day..."

LOL!

So I snitched it and told him I was going to create a layout and post it on FB. 

His mistake was not believing me... :)

Here are some close-ups.  The "leaves" are simple 3" pieces of ribbon, folded in half and tied with twine.  I attached the leaves to the page and then twisted the twine in petal shapes and adhered using Glue Dots.  I created the flower from a strip of denim fabric, to match the denim-look stickers and to bring out the blue from his leisure suit! Hee hee...  


Gary and I brainstormed for a title.  Some of the rejects?
Leisure Suit Larry.
When EF Hutton Talks...
Pint-Size Banker.
Leisure Suits Never Looks So Good.

This last one finally evolved into "Hey, I Make Leisure Suits Look Good!"  It's perfect, because I can totally hear Scott, with his acerbic wit and dry humour, saying that!  Journaling reads:

"In hunting for photos for Jessie's memorial, we came across this photo of Scott when he was maybe 4 or 5 years old.  He looks like a mini banker!  Cracks me up - every time!"


The doily was a plain paper white one, from the dollar store.  I misted it with Adirondack Red Pepper colour wash - LOVE it!  Such a bright, pretty red!  The receipt tag came from some old collections tickets that we had left over at work - I snatched them up to use as ephemera!


If you're on Facebook, please stop by my wall and comment on this layout so that he gets all kinds of notices! :)  Ah, I love teasing him...

Sunday, November 06, 2011

An Altered Tale

Once upon a time, there was a princess.  She was a scrapbooker, but had ventured oh, so timidly into the altered arts, dipping a toe in, unsure if she wanted to jump right in.

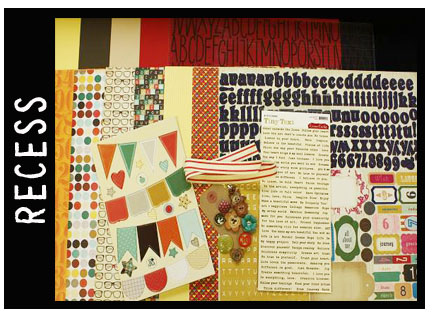
Then one day, a parcel arrived from WeScrap, purveyors of fine crafty things.  Inside the parcel was a beautiful kit, Recess, the likes of which the princess had not yet seen.  Upon seeing it, she immediately thought to herself, "Self, dare we venture into the altered arts with this beautiful treasure?"

Self ran crying into her bedroom and hid under the bed for a day or two.

Then she found courage (and an old clock, purchased for this exact reason) and forged ahead - no holds barred.

And life was good.

The End.


Supplies used:  Bazzill Basics cardstock; Fancy Pants and JilliBean Soup patterned paper; myStamp BOX bubble wrap stamp (Backgrounds); Versamark ink; Ranger embossing powder; Fancy Pants flocked transparency; Tim Holtz filmstrip transparency; Fancy Pants chipboard banners and accents; Fiskars and EK Success punches; Cosmo Cricket word stickers; The Twinery twine; Glue Dots; Glitz Designs rhinestone; Marvy Uchida pen; tag, ribbon, wooden buttons, metal brad and flower from the WeScrap November kit, Recess.

Isn't that a beautiful crafty story?  :)  It's a true story, loosely based on a certain someone I know very well...

Here are some close-ups (I took the glass out for the photos to avoid any glare):


I'm pretty happy with how it turned out!  And it's colour palette is a good match for my scrapbooking studio so I can't wait to hang it in there!

I know that there are some crafters out there, like the princess me, who love the look of altered items, but are not quite sure where to start.  With that in mind, I took photos of the process so I could share them with you!

To begin, you'll need the following items:

  • clock
  • screwdriver (if needed)
  • paint to match clock base (mine's black)
  • paintbrush
  • scrapbooking supplies to create your clock face "layout"
For your clock, look for one with a shadow box-type base so you can keep the glass on to protect your artwork.  I picked mine up at the Dollar Store for $2 - the black base is plastic and it's pretty cheap, but okay for my first time trying this.  Next time, I will try something a little more durable.

To remove the glass cover, turn it over and remove the screws.


Next, lift off the cover and the glass and set aside.


Now you need to remove the clock works.  Because I've never done this before, I'm not sure if all clocks have the same mechanics, but here's how I did mine.  First pull off the second hand.  Mine looked like a brad-like plug that stuck into a plastic tube thingy.

And why yes, that's the technical terminology for it, now that you ask!

It's a stubborn little thing so take care not to bend it.


After removing the other two hands, there was a nut that screwed onto the base (which stuck up through the base of the clock from the back).  Unscrew the nut and remove.  Place them, along with the screws from the cover, in a bowl to keep them safe.


Measure your clock's diameter.  Mine is just over 9 inches.


Now cut two circles, one in a base cardstock and another in your clock layout base colour (cardstock or patterned paper).


You may choose to cut only one base for your layout.  I used the Canadian Scrapbooker Super Stock as my base (more on this gift from the gods later in the week!), because I wanted a sturdy background to which I could attach my layout, rather than attaching directly to the clock face.  This gives me the option to switch the backgrounds depending on my mood, the season, etc.

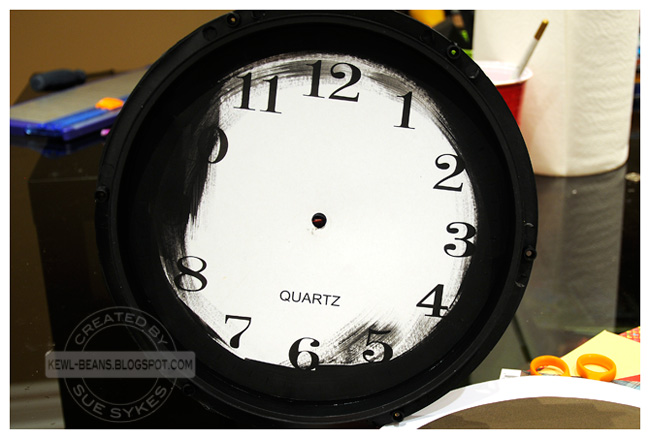
One last step:  Paint around the base of your clock face, taking care to cover all areas about 1/4 inch in from the sides.  (The rest of the face will be covered so it's not as important to be neat, further into the circle, as I have so conveniently demonstrated here. :))


The reason for doing this is that I didn't have circle cutter big enough to cut my base so I had to trace it, using the inside ring of my cover, and hand cut it.  I painted the clock face to match the base to cover any miniscule gaps.

Now you're ready to decorate your clock!  Using your cardstock or patterned paper base, complete a layout as you would a normal 12x12 (or other) page size.  Then, using the clock face as a guide, cut a hole out for the  clock motor and just assemble it back together, taking sure to line up your layout with the top at 12 o'clock!  That's it - you're done!  EZ PZ!

Here's a few tips, to save you some heartache:

1.  If you're using a photo with people in it, make sure that there is a big gap in between them, or that they are on one side of the photo so the hole will not be on anyone's face.

2.  You can use chipboard and other dimensional embellishments, but keep in mind that they have to be thin enough to let the hands pass over them.  If it's chunky and you just have to put it on, then make sure that it's off to the side, out of reach of the hands.

3.  Before screwing your clock cover back on, put a battery in and make sure that the clock hands actually move and don't get caught on anything.  It will save you the hassle of having to disassemble and reassemble it four times... Like a certain someone I know very well :s  If you are going to photography it, I would add the cover with just a screw or two, without the glass, to avoid any glare.

Good luck!  Please share a link to your clock, if you try this out!

Friday, November 04, 2011

Leave Your Legacy: Random Acts of Kindness

Welcome to a new Leave Your Legacy challenge! If you're new to my blog, welcome! You can learn more about my Leave Your Legacy challenge here.

Yesterday's post about RAKs got me to thinking.  The purpose of these challenges are to leave your descendants with more information about you:  your likes/dislikes, your hopes/dreams, your everyday life.  More importantly, though, we want to show our future generations WHO we are/were as people.  To know the true me (and you) so that they can have a better understanding of us.

Today's challenge is this:
Document a Random Act of Kindness that you have done for a stranger.  It could be something as simple as buying coffee for a homeless person, or sending a handwritten letter to a relative or friend.  If you can't think of anything that you've done, the previous post has a couple of sites that can help you on your way.

If you'd like to participate in this year long challenge, please share your layout below, using Linky Tools, by 11:59pm EST on December 31st, 2011. Please see the Leave Your Legacy page for guidelines, before linking here. Winners will be announced on January 1st, 2012.


Happy Random Acts of Kindness Day!


Now this is a holiday of which I wholeheartedly approve!  No mass marketing. No retail giants trying to make me part with my money.  Just celebrating and encouraging people who practice random acts of kindness.

Remember the movie Pay It Forward?  It's easy to do.  There's a great list of 29 ways to celebrate today on www.lifehack.org right here - these are some of my favourites:
  • Make a card at home and send it to a friend for no reason.
  • Give a compliment about your waiter / waitress to his / her manager.
  • Send someone a small gift anonymously.
  • Pay for the drinks on the next table at a cafĂ©.
  • Hold the train door open for someone rushing to get in. (Or any door for that matter.)
  • Give up your seat for someone, not just an elderly person.
  • Talk to a homeless person and have a “normal” conversation.
  • Buy an inspirational book for a friend.
  • Send a thank you note to a person who has helped you in the past.
  • Smile a lot.
To celebrate today, I'm going to challenge you to practice a random act of kindness today and leave me a comment about your RAK.  Because I really believe in this practice and want to encourage everyone to try, I will send a little something to everyone who leaves a comment on this post today from now until 11:59pm EST!!  It could be anything from a handmade card to chocolate to a stack of scrapbooking paper!  Just please remember to leave your name and email address so I can contact you for your mailing info.

And if you so choose to practice this great act more often, here's a great site that posts daily Kindness ideas to inspire and motivate you.  And to help spread the word, this site has free printable cards you can download!

So go out today and practice a little random act of kindness - and make the world a happier place.

Thursday, November 03, 2011

Stick a Fork In Me

I'm DONE!!!

Finally.  Today was my last inventory for my stores for 2011.  Three inventory counts within six weeks of each other.

Okay, so I don't have to count every eyeliner and condom that my store carries.  But honestly, I think I'd rather be on the floor with a Telxon.  While my part is not difficult, it IS time consuming.  Not to mention the amount of trees I have to slaughter with photocopying all the required reports for our head office.

Today's inventory went very well, which, in my opinion, was a nice way to end the whole ordeal!

And just when I think it's over and I'll get a moment's peace, my District Manager and Store Systems Coordinator asked me to take over another store whose Store Administrator just left, and to take a new hire under my wing and train him/her.

Sigh.  At least it will keep me out of trouble... I hope! :s

Wednesday, November 02, 2011

Pass the Candy...

er, I mean, DON'T pass the candy!

We have more than enough around here:


They each have an entire BOXFUL of candy, plus we have enough candy left over to fill another box!  I think we'll make a run out to the Downtown Mission this weekend, and donate some of it, in order to preserve our dental health around here! :)

I took photos of both of the kids this year, but my memory card became corrupted and I lost six or seven photos - of course, I only took about 10 so that's the majority of them! :(  Luckily, we had Connor's friend, Bailey, join us for the evening, along with his family - his mom, Amanda, had her camera too so hopefully I can share some of hers!

Connor's costume was another original this year - his photo was one of the ones lost this year - but here's the bulk of his costume:


Sorry it's so grainy - Gary snapped it with his Blackberry on Saturday during the making-of...

Have you guessed it yet?  Add some fake blood, dress him in dark jeans and a black hoodie, with a black toque...

Yep, he's a "cereal" killer!  Get it?  SERIAL killer?? HAHA!

Once again, he scored big on the candy level for having a unique costume, much like the iPod Touch costume of 2010.

This year, Aili decided to be a "Devil Queen":


I was originally going to paint her face red - until I read the warnings on the facepaint package that said it may take three or four days to fade!  So we opted for dark, sultry eyes, black lipstick and glitter on her cheekbones.  She was so excited to be wearing eyeliner, eyeshadow and *gasp* mascara! :)

The white fangs were her idea...  I'm not sure how they relate?? The good news is that her canines already seem so pointy, with her front teeth barely in, that the painted fangs just seem to be an extension of the actual teeth!

Hope you had a wonderful Hallowe'en!

Tuesday, November 01, 2011

WeScrap November Kit Reveal - Recess


WeScrap revealed its' latest kit today - Recess - and it's even nicer in real life!  As I type, it's on my scrap desk, waiting patiently for me to come and play!

A steal for only $19.99 USD,  you can get yours here in the Etsy shoppe!
Related Posts Plugin for WordPress, Blogger...